Thursday 7 May 2020

9: Steps to Uninstall Spfx WebPart/Extension from Site

Before we deployed Spfx Extension Using CDN Configuration.


9.1: Steps to Uninstall Spfx WebPart/Extension from Site

Note: To uninstall Spfx webpart/Extension whatever you are removing you have to delete from recycle bins. First stage Recycle Bin and Second Stage Recycle Bin.
Let's Remove Extension:

1: First Go to site contents: click on your app and select remove

2: It will take you to Classic SharePoint screen, remove from here as well.

3: Remove from all recycle bins second level as well


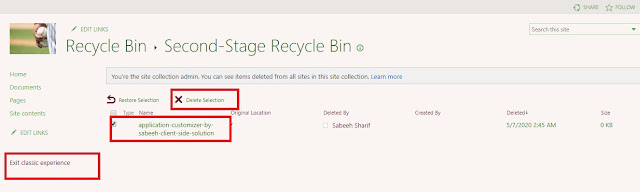
Go to Second Level Recycle Bin: Site Settings -> Recycle Bin -> Second-stage recycle bin


Delete this file from here as well.


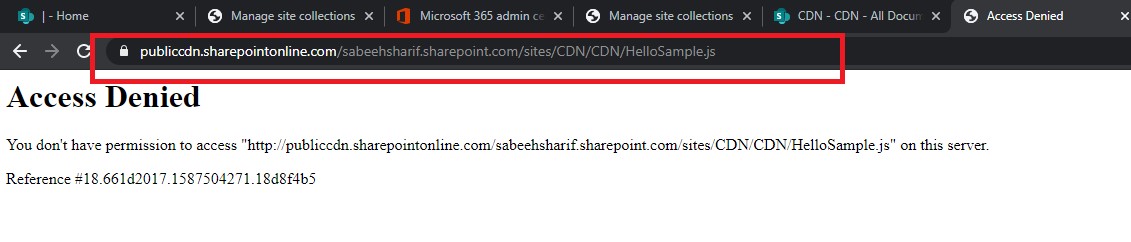
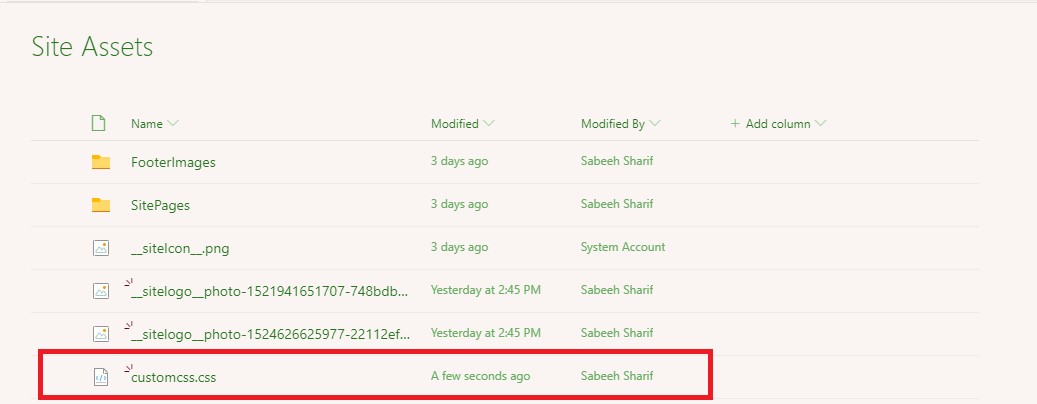
4: Go to your Public CDN from the document library remove the 3 files


5: Go to your site contents from ShareApps catalog delete the file and delete from recycle bins as well

After removing from here just click on Exit Class Experience


Go to Apps for SharePoint(Site Contents):


Select your app and Delete this:


Delete from Recycle Bin as well. Site Settings -> Recycle Bin -> Select Your app and delete

Don’t forget to delete from Second-storage recycle bin as well.

Finally your app is uninstalled. 

Follow these steps: How to Install Spfx Extension.

Thanks Best Of Luck. If you stuck somewhere please feel free to ask in Comment. #SharingIsCaring 


8: App catalog missing from SharePoint Modern site content

Before we deployed our spfx extension. Extension Deployment

8.1: App catalog missing from SharePoint Modern site content

If by default Apps For SharePoint is not available you have to perform following steps:


1: Run SharePoint Online Management Shell


2: Connect with your site by editing url like this:
https://<SiteCollectionName>-admin.sharepoint.com
Example: https://sabeehsharif-admin.sharepoint.com

3: Run this command:
$site = Get-SPOSite <SiteCollectionUrl>
Example: $site = Get-SPOSite https://sabeehsharif.sharepoint.com/

4: Run this command:
Add-SPOSiteCollectionAppCatalog -Site $site

5: Now go and verify your site content


Here you can upload your .sppkg package of SharePoint spfx.


Next 9: Steps to Uninstall Spfx WebPart/Extension from Site

Thanks Best Of Luck. If you stuck somewhere please feel free to ask in Comment. #SharingIsCaring 

7: Deployment of Extension/WebPart to CDN without debug mode


As in point 6 we have configured CDN, now we will upload binaries our extension. If you didn't configure CDN please follow this: CDN Configuration for Extension deployment


7.1: Changes Required in spfx extension code before Deployment
1: Update the CDN path in write-manifests.json

2: Final Change in elements.xml we are making change this file because once our extension deployed we don’t want to pass properties as query string:


Modified Elements.xml as per our extension:

Set properties than these properties will be passed from here no need to pass via query string.
<?xml version="1.0" encoding="utf-8"?>
<Elements xmlns="http://schemas.microsoft.com/sharepoint/">
    <CustomAction
        Title="ModifyOtbApplicationCustomizer"
        Location="ClientSideExtension.ApplicationCustomizer"
        ClientSideComponentId="5b595d7e-c3cd-407f-9ca8-91c3bfe50080"
        ClientSideComponentProperties="{&quot;cssurl&quot;:&quot;/SiteAssets/customcss.css&quot;,
        &quot;Bottom&quot;:&quot;Follow us on:&quot;,
        &quot;Logo&quot;:&quot;/SiteAssets/FooterImages/LinkedIn.png&quot;,
        &quot;testMessage&quot;:&quot;Test message&quot;}">
    </CustomAction>
</Elements>

For your Reference:

3: Run this command: gulp bundle –ship

This command will generate file on this path:
..\Temp -> deploy -> copy these files and paste in CDN folder

4: Upload These files in CDN Library we created during CDN Configuration:

5: Run this Command: gulp package-solution –ship
This command will generate .sppkg

Go to this path ..\sharepoint\solution

Upload this file to: App Catalog (Site Contents -> Apps for SharePoint)
Follow steps defined here: If Apps for SharePoint is Missing: Solution


Next upload your .sppkg to and Click on Deploy

Now go to Add an App

Here you will get your Newly uploaded App just click on this app will install:

Installing app:


After this refresh the page you will see your changes without query string
Hurry your app is running without debug mode:

If SharePoint apps catalog is missing here is a Solution. Follow these steps to

Next Generate SharePoint Apps Library


Thanks Best Of Luck. If you stuck somewhere please feel free to ask in Comment. #SharingIsCaring 

Wednesday 6 May 2020

6: Configuration Of CDN to deploy Spfx Extension

Before we completed to get DOM elements without using SharePoint Designer.

Now we are going to configure CDN:

6.1 Introduction of CDN and Types

Content Delivery Network (CDN) is a place where you can place common files like assets style sheets, Js files, Json, jpeg, ping etc. Expose these files so applications like SharePoint spfx webpart or extensions can get files from this location.
CDN have 2 types:
                A: Private CDN (Used to apply high level permissions)
                B: Public CDN (Files used by SPFX web parts can only utilize the Public CDN and clientSideAssets folder)
For Details: https://docs.microsoft.com/en-us/office365/enterprise/use-office-365-cdn-with-spo

6.2: Steps to create SharePoint CDN site

1: Create site collection with teamsite and create document library to save fileshttps://portal.office.com/adminportal/home#/homepage

Open this site collection: 


2: Now create Document library where we will upload files to treat as CDN files.

6.3: PowerShell Commands to enable CDN for Document Library

1: Connect to SharePoint Online using:  https://<sitename>-admin.sharepoint.com
      Connect-SPOService –Url https://sabeesharif-admin.sharepoint.com

2: Command to check CDN is already enabled on this site or not
      Get-SPOTenantCdnEnabled –CdnType Public
if its false run following command:
      Set-SPOTenantCdnEnabled -CdnType Public
It will take 15 minutes to enable public CDN keep checking using until, it shows True
      Get-SPOTenantCdnOrigins -CdnType Public

3: Add newly created library to CDN using following command (path of our document library)
     Add-SPOTenantCdnOrigin -CdnType Public –OriginUrl sites/cdn/documentlibraryName
Again it will take 15 mins to apply


Keep checking until Pending status removed using following command:
     Get-SPOTenantCdnOrigins -CdnType Public

6.4: Provision of unsupported files for CDN using PowerShell

First let’s check by default supported files

1: Let’s check CDN supported files extensions by default:
      Get-SPOTenantCdnPolicies -CdnType Public 


2: We got scenario in which we have to get .txt and .js files as well so there is a PowerShell command to provision these extensions in CDN. On your Desktop create one file with .txt and one with .js extension and upload to this CDN document library


Upload these files In Document library:


3: Let’s try to access js file using browser: Modify URL like below:

4: On Browser you will get Access denied because these files are not publically accessible only you can get using Spfx or by passing token using Postman. So only valid users can access these files


6.5: Test CDN Configurations using Postman

1: Now open Postman to check these files are accessible outside or not. You have to pass Referer as header in.


2: Now let’s give it try to access .txt file: This file is not accessible because we didn’t register .txt extension in our CDN policies


3: To check registered policies: as you can see txt file is missing

4: Register new extension txt in CDN Policies:
Run this command:
Set-SPOTenantCdnPolicy -CdnType Public -PolicyType IncludeFileExtensions -PolicyValue "CSS,EOT,G
IF,ICOJPEG,JPG,JS,MAP,PNG,SVG,TTF,WOFF,TXT"


5: Now try to access .txt file using postman, will be accessible.
6: Finally, CDN Configuration completed.


Now time to upload our binaries of extension to CDN.

Next 7: Deployment of Extension/WebPart to CDN withoutdebug mode


Thanks Best Of Luck. If you stuck somewhere please feel free to ask in Comment. #SharingIsCaring 

5: Inject External CSS in Modern UI

Before we applied branding using Microsoft Theme Generator.

Now we are going to Inject our custom CSS in DOM using Application Customizer.

5: Inject External CSS in Modern UI


If you are familiar with Application Customizer, it only provides two placeholders Header and Bottom but if you want to override UI of Navigation than? 
Because till now Microsoft didn’t announce new placeholders. So only option available is to inject CSS in DOM. Ok let’s referenced our previously developed extension.

5.1: Create External CSS to update navigation UI

You can use inspect element to get ID or class of element on which you want to apply your customized CSS.
1: Create external CSS file customcss.css
2: Paste your CSS, I am using following CSS

a.ms-HorizontalNavItem-link.is-not-selected:hover,
a.ms-HorizontalNavItem-link.is-selected:hover {
    color#196586;
    backgroundrgba(0000.05);
}

a.ms-HorizontalNavItem-link.is-not-selecteda.ms-HorizontalNavItem-link.is-selected {
    border0;
    displayblock;
    padding10px 15px;
    font-size18px;
}

[dir='ltr'.ms-HorizontalNavItem:not(:last-child) {
    margin-right8px !important;
}

[data-automationid="SiteHeader"] {
    height88px!important;
    /* padding-top: 15px; */
}

button#HorizontalNav3EditLink {
    displaynone;
    padding10px;
}

.linkSelected-97 {
    color#196586;
}

a.ms-HorizontalNavItem-link.is-selected {
    color#196485;
}

a.ms-HorizontalNavItem-link.is-selected {
    background#e8e8e8;
}


3: Upload CSS in site assets/ style library of your site collection. 


5.2: Inject CSS in DOM using available Placeholders Header
and Bottom

1:Open your visual studio code where you developed Spfx Application Customizer.
2: Define Variable in your ts file like this for new property:

cssurl: string;


3: Open your server.json and add reference your customcss.css in “cssurl” property


4: Render/load Customcss in your ts file. Load Css in application customizer _renderPlaceHolders(); function:
let customCssString: string = this.properties.cssurl;
    if (!customCssString) {
      console.error('Custom CSS URL was not defined.');
    }
    console.log(customCssString);
    if (customCssString) {
      // inject the style sheet
      const head: any = document.getElementsByTagName("head")[0|| document.documentElement;
      console.log(head);
      let customStyle: HTMLLinkElement = document.createElement("link");
      customStyle.href = customCssString;
      customStyle.rel = "stylesheet";
      customStyle.type = "text/css";
      head.insertAdjacentElement("beforeEnd", customStyle);
    }

For your reference:


Save all your changes and run gulp serve in node command prompt.

6: Copy the URL in paste in browser:

Before customcss.css Navigation looks:


After customcss.css Navigation looks:


As you can see in query string properties we have to pass like Logo and Custom CSS but after deployment you don't need to pass lets Deploy your achievement with custom injected CSS.

Next 6: Configuration of CDN for spfx Extension Deployment

Thanks Best Of Luck. If you stuck somewhere please feel free to ask in Comment. #SharingIsCaring