1: Basics of Spfx Extensions
This tutorial for those who knows basics of Spfx but no worries basics will not take to too much time to understand the structure of spfx. Basics of Spfx Extensions
1: Create folder in your local drive and open Node.js command prompt run as administrator. In this tutorial Node version, I am using 10.x

2: Yeoman SharePoint Generator Command to create the solution: yo @microsoft/sharepoint


4: As I described Extensions have 3 types but we are going to create Application Customizer

5: Enter name of your extension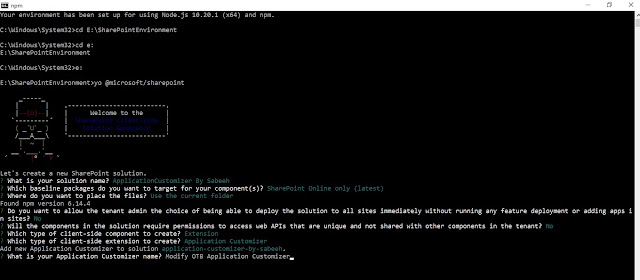
6: Now it will take some time to create basic solution for you

7: Once project created successfully: run this command: gulp serve and copy this highlighted url.

8: Open note pad and paste the URL:


This tutorial for those who knows basics of Spfx but no worries basics will not take to too much time to understand the structure of spfx. Basics of Spfx Extensions
1: Create folder in your local drive and open Node.js command prompt run as administrator. In this tutorial Node version, I am using 10.x

2: Yeoman SharePoint Generator Command to create the solution: yo @microsoft/sharepoint

The Highlighted line I am inserting “N” because we will
deploy manually just after sometime. For Api access also set “N” because
currently we don’t want any 3rd party Api access.
3: Now select Extension

4: As I described Extensions have 3 types but we are going to create Application Customizer

5: Enter name of your extension

6: Now it will take some time to create basic solution for you

7: Once project created successfully: run this command: gulp serve and copy this highlighted url.

8: Open note pad and paste the URL:

Replace highlighted url with your SharePoint online site
collection URL like this: I am replacing with Root site

9: Paste this URL in browser you should get following
alert message:
Hurry! finally your extension is running

We will discuss further URL with Query string. It contains
your properties like text needs to be shown on alert as a message. Because it’s
an application customizer so wherever you will go or visit any page your will
get this alert.
Advantage: Application Customizer will be available to all
your pages just like your master page.
3: Modify Application Customizer Apply Social Media links in Modern UI Footer
Thanks Best Of Luck. If you stuck somewhere please feel free to ask in Comment. #SharingIsCaring
No comments:
Post a Comment